Development
Welcome to the development docs of Khoj! Thanks for your interest in being a contributor ❤️. Open source contributors are a cornerstone of the Khoj community. We welcome all contributions, big or small.
To get started with contributing, check out the official GitHub docs on contributing to an open-source project.
Join the Discord server and click the ✅ for the question "Are you interested in becoming a contributor?" in the #welcome-and-rules channel. This will give you access to the #contributors channel where you can ask questions and get help from other contributors.
If you're looking for a place to get started, check out the list of Github Issues with the tag good first issue to find issues that are good for first-time contributors.
Local Server Installation
Using Pip
1. Khoj Installation
- MacOS
- Windows
- Linux
# Get Khoj Code
git clone https://github.com/khoj-ai/khoj && cd khoj

# Create, Activate Virtual Environment
python3 -m venv .venv && source .venv/bin/activate

# For MacOS or zsh users run this
uv sync --all-extras
# Get Khoj Code
git clone https://github.com/khoj-ai/khoj && cd khoj

# Create, Activate Virtual Environment
python3 -m venv .venv && .venv\Scripts\activate

# Install Khoj for Development
uv sync --all-extras
# Get Khoj Code
git clone https://github.com/khoj-ai/khoj && cd khoj

# Create, Activate Virtual Environment
python3 -m venv .venv && source .venv/bin/activate

# Install Khoj for Development
uv sync --all-extras
2. Postgres Installation & Setup
Khoj uses the pgvector package to store embeddings of your index in a Postgres database. To use this, you need to have Postgres installed.
- MacOS
- Windows
- Linux
- From Source
Install Postgres.app. This comes pre-installed with pgvector and relevant dependencies.
- Use the recommended installer.
- Follow instructions to Install PgVector in case you need to manually install it. Windows support is experimental for pgvector currently, so we recommend using Docker. Refer to Windows Installation Notes below if there are errors.
- Follow instructions to Install Postgres
- Follow instructions to Install PgVector in case you need to manually install it.
Create the Khoj database
Make sure to update your environment variables to match your Postgres configuration if you're using a different name. The default values should work for most people. When prompted for a password, you can use the default password postgres, or configure it to your preference. Make sure to set the environment variable POSTGRES_PASSWORD to the same value as the password you set here.
- MacOS
- Windows
- Linux
createdb khoj -U postgres --password
createdb -U postgres khoj --password
sudo -u postgres createdb khoj --password
3. Build the front-end assets
cd src/interface/web/
bun install
bun export
You can optionally use bun dev to start a development server for the front-end which will be available at http://localhost:3000. This is especially useful if you're making changes to the front-end code, but not necessary for running Khoj. Note that streaming does not work on the dev server due to how it is handled with SSR in Next.js.
Always run bun export to test your front-end changes on http://localhost:42110 before creating a PR.
4. Run
- Start Khoj
khoj -vv - Configure Khoj
- Via the Desktop application: Add files, directories to index using the settings page of your desktop application. Click "Save" to immediately trigger indexing.
Note: Wait after configuration for khoj to Load ML model, generate embeddings and expose API to query notes, images, documents etc specified in config YAML
Windows Installation Notes
- Command
khojNot Recognized- Try reactivating the virtual environment and rerunning the
khojcommand. - If it still doesn't work repeat the installation process.
- Try reactivating the virtual environment and rerunning the
- Python Package Missing
- Use
uv add xxxand try running thekhojcommand.
- Use
- Command
createdbNot Recognized- make sure path to postgres binaries is included in environment variables. It usually looks something like
C:\Program Files\PostgreSQL\16\bin - Connection Refused on port xxxx
- Locate the
pg_hba.conffile in the location where postgres was installed. - Edit the file to have trust as the method for user postgres, local, and host connections.
- Below is an example:
- Locate the
host    all             postgres        127.0.0.1/32            trust
# "local" is for Unix domain socket connections only
local   all             all                                     trust
# IPv4 local connections:
host    all             all             127.0.0.1/32            trust
# IPv6 local connections:
host    all             all             ::1/128                 trust
- Errors with installing pgvector
- Reinstall Visual Studio 2022 Build Tools with:
- desktop development with c++ selected in workloads
- MSVC (C++ Build Tools), Windows 10/11 SDK, and C++/CLI support for build tools selected in individual components.
- Open the x64 Native Tools Command Prompt as an Administrator
- Follow the pgvector windows installation instructions in this command prompt.
- Reinstall Visual Studio 2022 Build Tools with:
Using Docker
Make sure you install the latest version of Docker and Docker Compose.
1. Clone
git clone https://github.com/khoj-ai/khoj && cd khoj
2. Configure
- Update docker-compose.yml to use relevant environment variables.
- Comment out the
imageline and uncomment thebuildline in theserverservice
3. Run
This will start the Khoj server, and the database.
docker-compose up -d
4. Upgrade
If you've made changes to the codebase, you'll need to rebuild the Docker image before running the container again.
docker-compose build --no-cache
Update clients
In whichever clients you're using for testing, you'll need to update the server URL to point to your local server. By default, the local server URL should be http://127.0.0.1:42110.
Validate
Before Making Changes
- Install Khoj. Setup Git Hooks for Validation
./scripts/dev_setup.sh- Installs the khoj server and web app by default. Use the
--fullflag to install the Khoj Desktop and Obsidian client apps as well. - Git hooks format code, check types automatically on every commit and push respectively.
- Note 1: If pre-commit didn't already get installed, install it via
pip install pre-commit - Note 2: To run the pre-commit changes manually, use
pre-commit run --hook-stage manual --allbefore creating PR
- Installs the khoj server and web app by default. Use the
Before Creating PR
You should be in an active virtual environment for Khoj in order to run the unit tests and linter. The dev_setup.sh script will automatically create and activate it for you.
- Ensure that you have a Github Issue that can be linked to the PR. If not, create one. Make sure you've tagged one of the maintainers to the issue. This will ensure that the maintainers are notified of the PR and can review it. It's best to discuss the code design on an existing issue or Discord thread before creating a PR. This helps get your PR merged faster.
- Run unit tests.
pytest - Run the linter.
mypy - Think about how to add unit tests to verify the functionality you're adding in the PR. If you're not sure how to do this, ask for help in the Github issue or on Discord's
#contributorschannel.
After Creating PR
- Automated validation workflows should run for every PR. Tag one of the maintainers in the PR to trigger it.
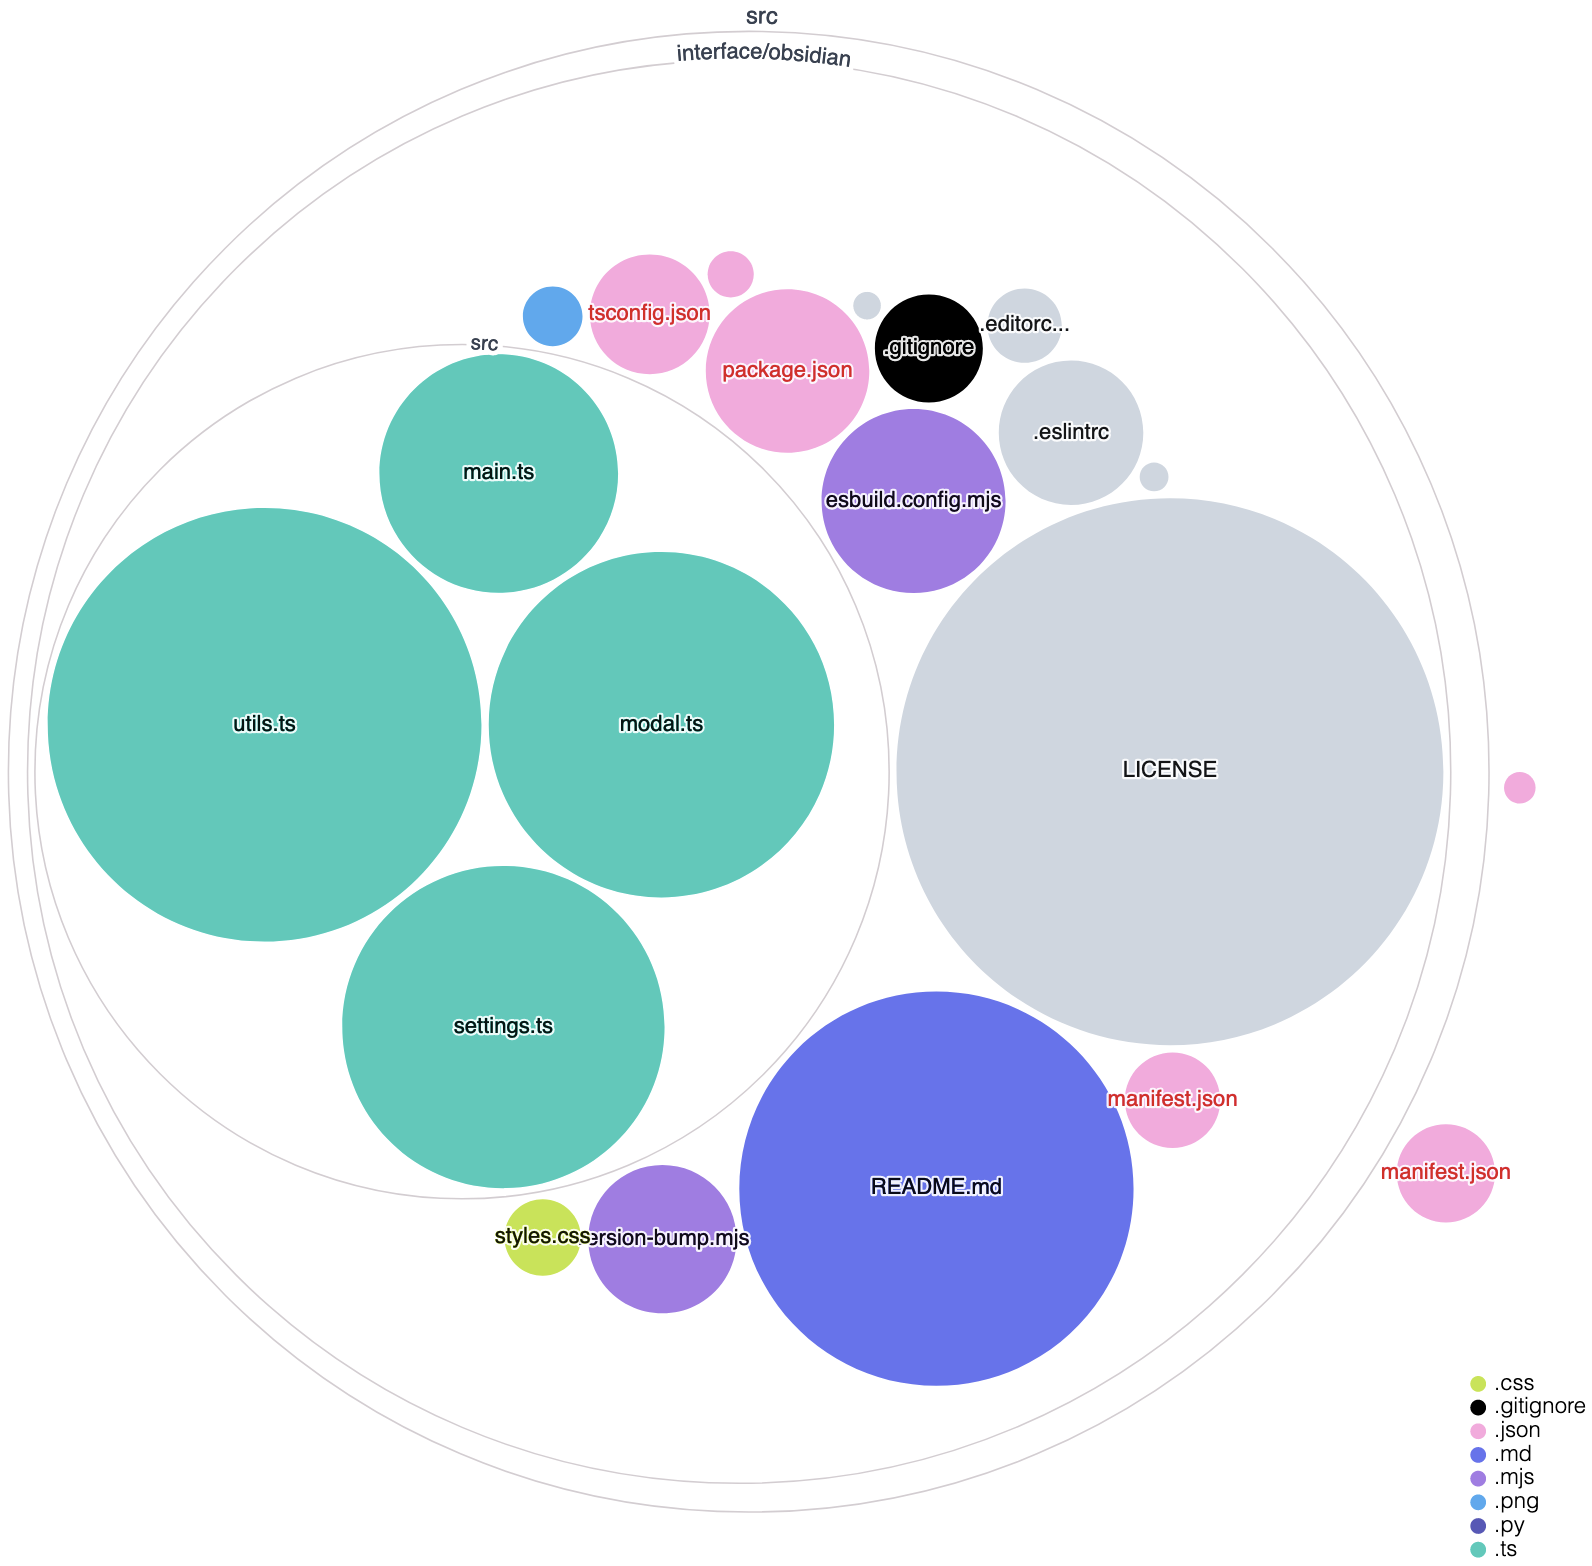
Obsidian Plugin Development
Plugin development setup
The core code for the Obsidian plugin is under src/interface/obsidian. The file main.ts is a good place to start.
- In your CLI, go to the directory
src/interface/obsidianin the Khoj repository. - Run
yarn installto install the dependencies. - Run
yarn devto start the development server. This will continually rebuild the plugin as you make changes to the code.- Your code changes will be outputted to a file called
main.jsin theobsidiandirectory.
- Your code changes will be outputted to a file called
Loading your development plugin in Obsidian
- Make sure you have the Khoj plugin installed in Obsidian. See the plugin page.
- Open Obsidian and go to your settings (gear icon in the bottom left corner)
- Click on 'Community Plugins' in the left panel
- Next to the 'Installed Plugins' heading, click on the folder icon to open the folder with the plugin's source code.
- Open the
khojfolder in the file explorer that opens. You'll see a file calledmain.jsin this folder. To test your changes, replace this file with themain.jsfile that was generated by the development server in the previous section.
Create Khoj Release (Only for Maintainers)
Follow the steps below to release Khoj. This will create a stable release of Khoj on Pypi, Melpa and Obsidian. It will also create desktop apps of Khoj and attach them to the latest release.
- Create and tag release commit by running the bump_version script. The release commit sets version number in required metadata files.
./scripts/bump_version.sh -c "<release_version>"
- Push commit and then the tag to trigger the release workflow to create Release with auto generated release notes.
git push origin master  # push release commit to khoj repository
git push origin <release_version>  # push release tag to khoj repository
- [Optional] Update the Release Notes to highlight new features, fixes and updates
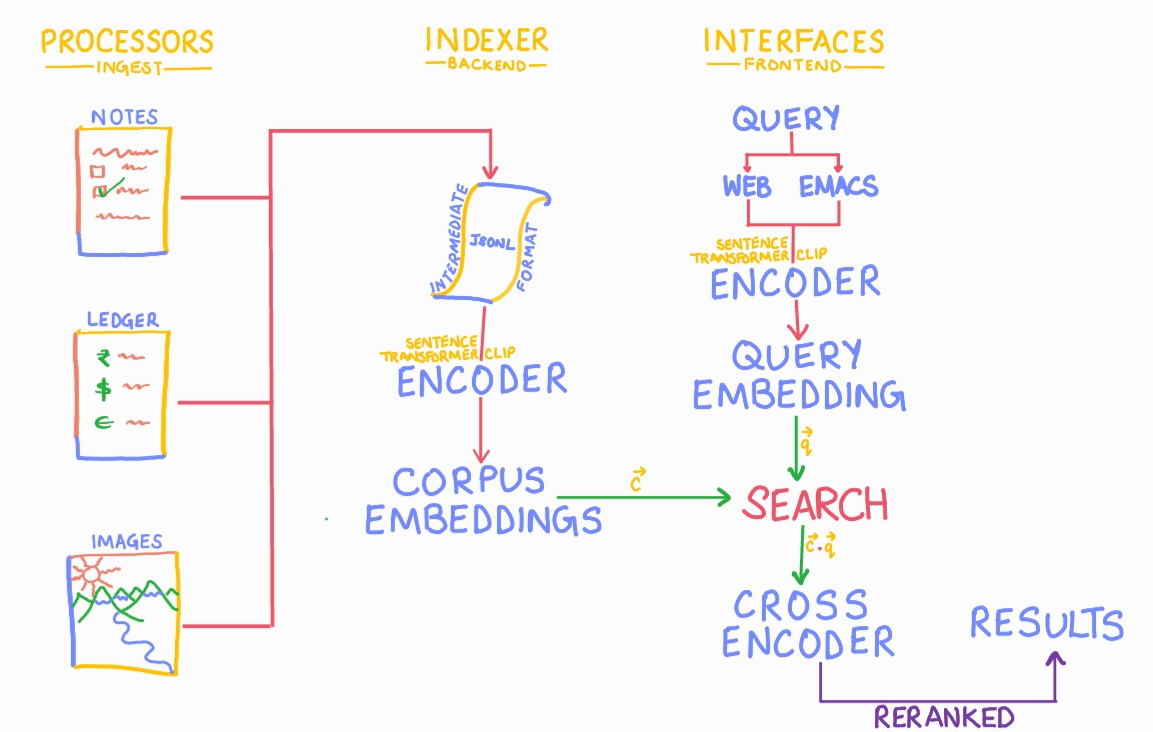
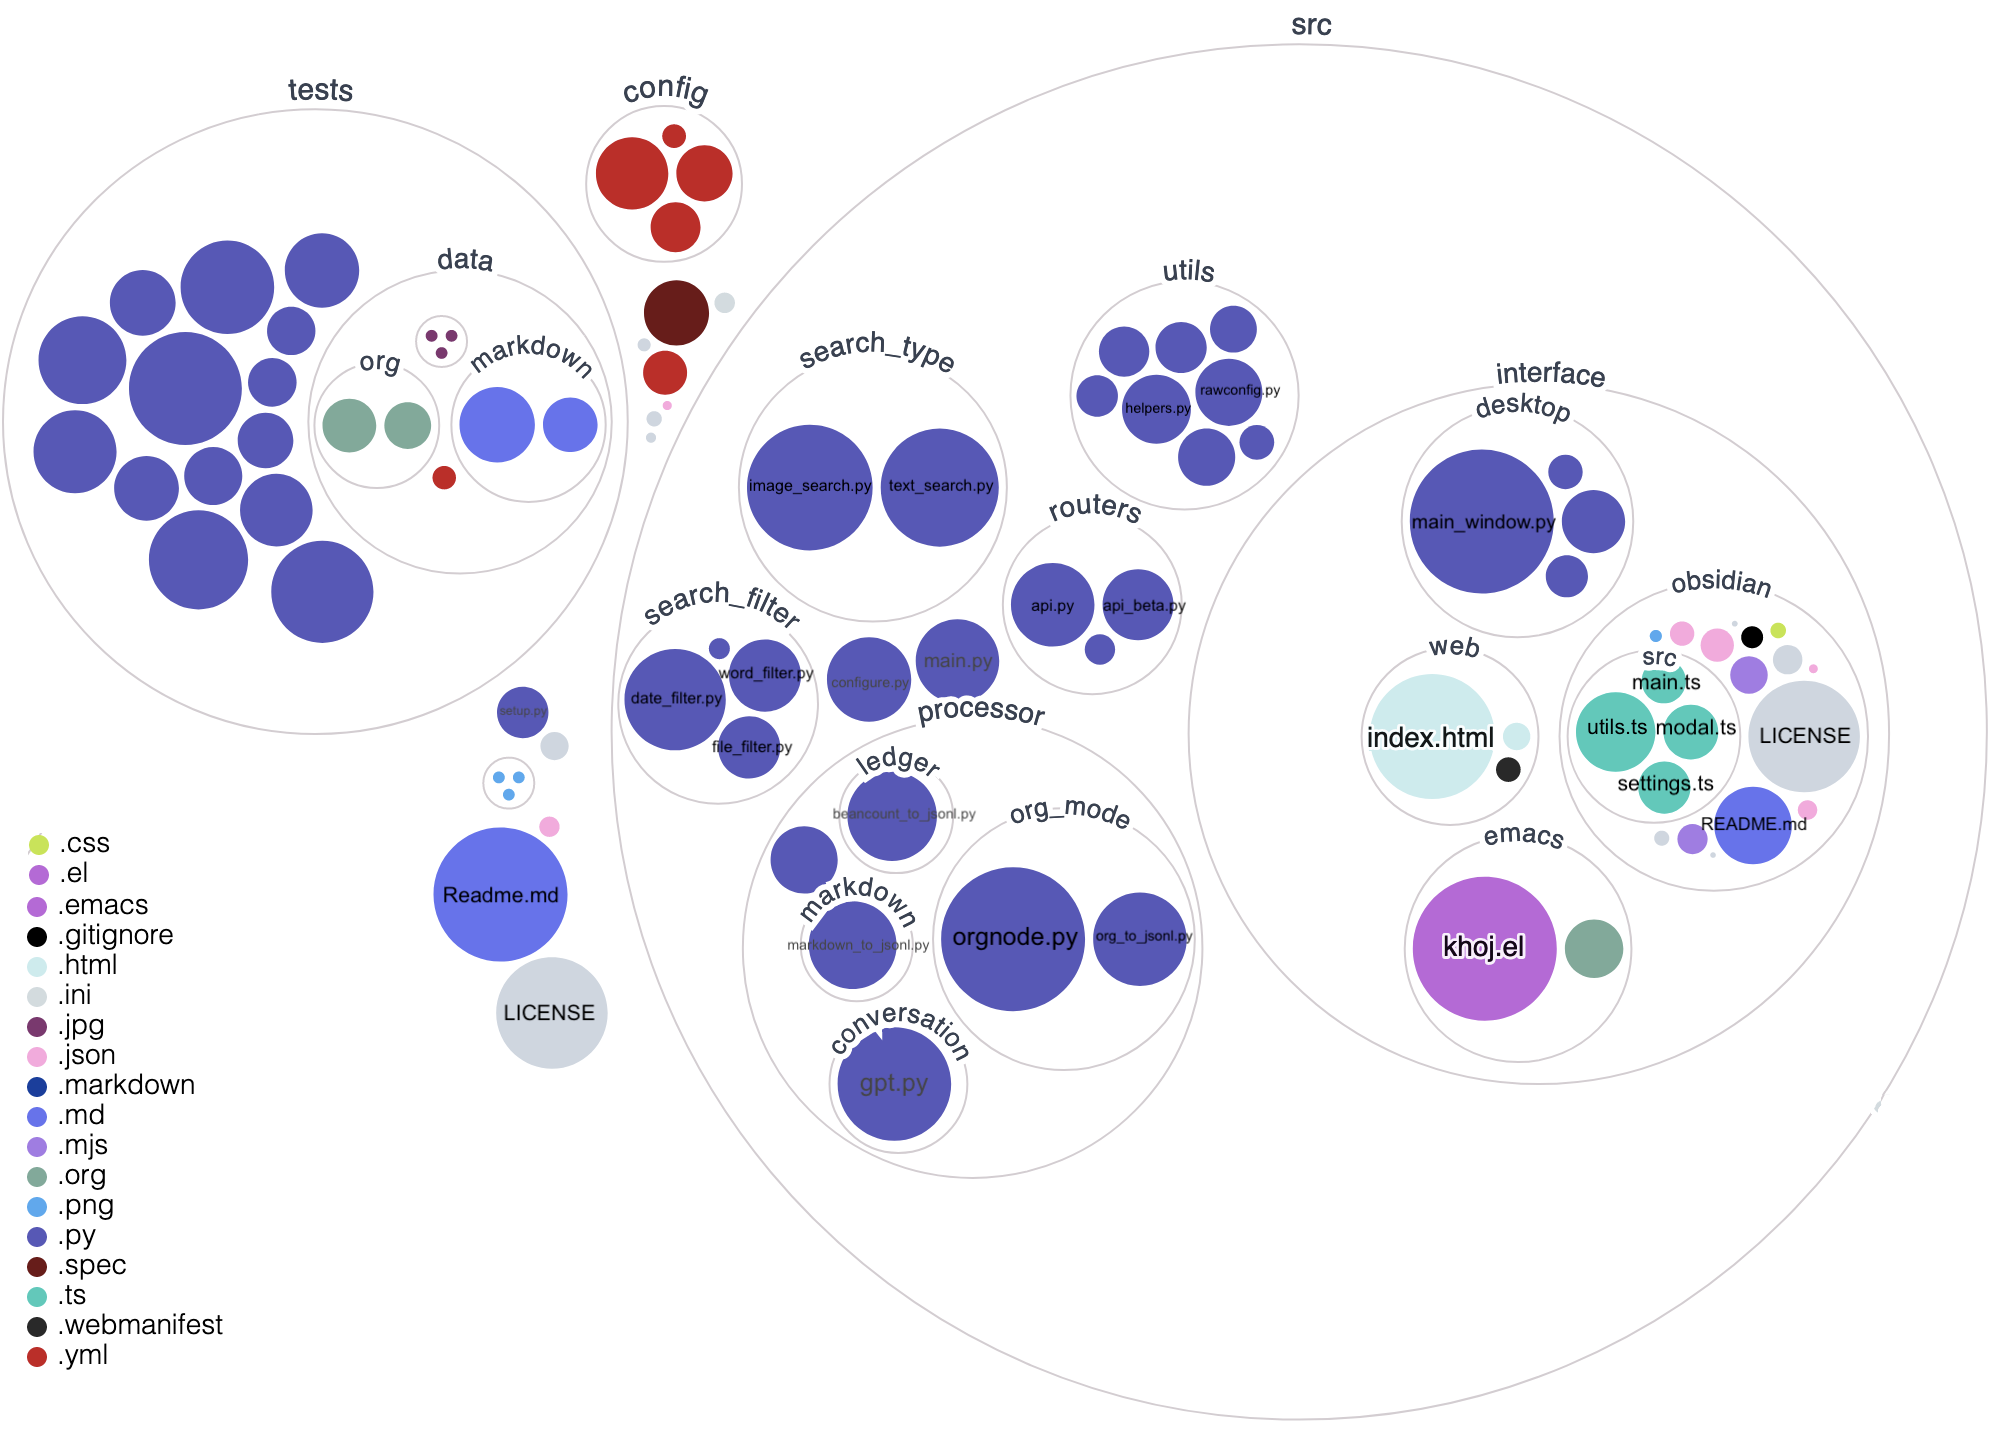
Architecture
Visualize Codebase
Visualize Khoj Obsidian Plugin Codebase