Self-Host
Learn about how to self-host Khoj on your own machine.
Benefits to self-hosting:
- Privacy: Your data will never have to leave your private network. You can even use Khoj without an internet connection if deployed on your personal computer.
- Customization: You can customize Khoj to your liking, from models, to host URL, to feature enablement.
Setup Khoj
These are the general setup instructions for self-hosted Khoj. You can install the Khoj server using either Docker or Pip.
Restart your Khoj server after the first run to ensure all settings are applied correctly.
- Docker
- Pip
- MacOS
- Windows
- Linux
Prerequisites
Docker
-
Option 1: Click here to install Docker Desktop. Make sure you also install the Docker Compose tool.
-
Option 2: Use Homebrew to install Docker and Docker Compose.
brew install --cask docker
brew install docker-compose
Setup
- Download the Khoj docker-compose.yml file from Github
mkdir ~/.khoj && cd ~/.khoj
wget https://raw.githubusercontent.com/khoj-ai/khoj/master/docker-compose.yml - Configure the environment variables in the
docker-compose.yml- Set
KHOJ_ADMIN_PASSWORD,KHOJ_DJANGO_SECRET_KEY(and optionally theKHOJ_ADMIN_EMAIL) to something secure. This allows you to customize Khoj later via the admin panel. - Set
OPENAI_API_KEY,ANTHROPIC_API_KEY, orGEMINI_API_KEYto your API key if you want to use OpenAI, Anthropic or Gemini commercial chat models respectively. - Uncomment
OPENAI_BASE_URLto use Ollama running on your host machine. Or set it to the URL of your OpenAI compatible API like vLLM or LMStudio.
- Set
- Start Khoj by running the following command in the same directory as your docker-compose.yml file.
cd ~/.khoj
docker-compose up
Prerequisites
- Install WSL2 and restart your machine
# Run in PowerShell
wsl --install - Install Docker Desktop with WSL2 backend (default)
Setup
- Download the Khoj docker-compose.yml file from Github
# Windows users should use their WSL2 terminal to run these commands
mkdir ~/.khoj && cd ~/.khoj
wget https://raw.githubusercontent.com/khoj-ai/khoj/master/docker-compose.yml - Configure the environment variables in the
docker-compose.yml- Set
KHOJ_ADMIN_PASSWORD,KHOJ_DJANGO_SECRET_KEY(and optionally theKHOJ_ADMIN_EMAIL) to something secure. This allows you to customize Khoj later via the admin panel. - Set
OPENAI_API_KEY,ANTHROPIC_API_KEY, orGEMINI_API_KEYto your API key if you want to use OpenAI, Anthropic or Gemini commercial chat models respectively. - Uncomment
OPENAI_BASE_URLto use Ollama running on your host machine. Or set it to the URL of your OpenAI compatible API like vLLM or LMStudio.
- Set
- Start Khoj by running the following command in the same directory as your docker-compose.yml file.
# Windows users should use their WSL2 terminal to run these commands
cd ~/.khoj
docker-compose up
Prerequisites
Install Docker Desktop. You can also use your package manager to install Docker Engine & Docker Compose.Setup
- Download the Khoj docker-compose.yml file from Github
mkdir ~/.khoj && cd ~/.khoj
wget https://raw.githubusercontent.com/khoj-ai/khoj/master/docker-compose.yml - Configure the environment variables in the
docker-compose.yml- Set
KHOJ_ADMIN_PASSWORD,KHOJ_DJANGO_SECRET_KEY(and optionally theKHOJ_ADMIN_EMAIL) to something secure. This allows you to customize Khoj later via the admin panel. - Set
OPENAI_API_KEY,ANTHROPIC_API_KEY, orGEMINI_API_KEYto your API key if you want to use OpenAI, Anthropic or Gemini commercial chat models respectively. - Uncomment
OPENAI_BASE_URLto use Ollama running on your host machine. Or set it to the URL of your OpenAI compatible API like vLLM or LMStudio.
- Set
- Start Khoj by running the following command in the same directory as your docker-compose.yml file.
cd ~/.khoj
docker-compose up
By default Khoj is only accessible on the machine it is running. To access Khoj from a remote machine see Remote Access Docs.
Your setup is complete once you see 🌖 Khoj is ready to engage in the server logs on your terminal.
1. Install Khoj Server
- Make sure python and pip are installed on your machine
- Check llama-cpp-python setup if you hit any llama-cpp issues with the installation
Run the following command in your terminal to install the Khoj server.
- MacOS
- Windows
- Linux
- ARM/M1+
- Intel
CMAKE_ARGS="-DGGML_METAL=on" python -m pip install 'khoj[local]'
python -m pip install 'khoj[local]'
Run the following command in PowerShell on Windows
- CPU
- NVIDIA (CUDA) GPU
- AMD (ROCm) GPU
- VULKAN GPU
# Install Khoj
py -m pip install 'khoj[local]'
# 1. To use NVIDIA (CUDA) GPU
$env:CMAKE_ARGS = "-DGGML_CUDA=on"
# 2. Install Khoj
py -m pip install 'khoj[local]'
# 1. To use AMD (ROCm) GPU
$env:CMAKE_ARGS = "-DGGML_HIPBLAS=on"
# 2. Install Khoj
py -m pip install 'khoj[local]'
# 1. To use VULCAN GPU
$env:CMAKE_ARGS = "-DGGML_VULKAN=on"
# 2. Install Khoj
py -m pip install 'khoj[local]'
- CPU
- NVIDIA (CUDA) GPU
- AMD (ROCm) GPU
- VULKAN GPU
python -m pip install 'khoj[local]'
CMAKE_ARGS="-DGGML_CUDA=on" FORCE_CMAKE=1 python -m pip install 'khoj[local]'
CMAKE_ARGS="-DGGML_HIPBLAS=on" FORCE_CMAKE=1 python -m pip install 'khoj[local]'
CMAKE_ARGS="-DGGML_VULKAN=on" FORCE_CMAKE=1 python -m pip install 'khoj[local]'
2. Start Khoj Server
Run the following command from your terminal to start the Khoj service.
USE_EMBEDDED_DB="true" khoj --anonymous-mode
--anonymous-mode allows access to Khoj without requiring login. This is usually fine for local only, single user setups. If you need authentication follow the authentication setup docs.
First Run
On the first run of the above command, you will be prompted to:- Create an admin account with an email and secure password
- Customize the chat models to enable
- Your setup is complete once you see
🌖 Khoj is ready to engagein the server logs on your terminal!
To start Khoj automatically in the background use Task scheduler on Windows or Cron on Mac, Linux (e.g. with @reboot khoj)
Use Khoj
You can now open the web app at http://localhost:42110 and start interacting!
Nothing else is necessary, but you can customize your setup further by following the steps below.
Add Chat Models
Login to the Khoj Admin Panel
Go to http://localhost:42110/server/admin and login with the admin credentials you setup during installation.Ensure you are using localhost, not 127.0.0.1, to access the admin panel to avoid the CSRF error.
If using a load balancer/reverse_proxy in front of your Khoj server: Set the environment variable KHOJ_ALLOWED_DOMAIN=your-internal-ip-or-domain to avoid this error. If unset, it defaults to KHOJ_DOMAIN.
You may hit this if you try access Khoj exposed on a custom domain (e.g. 192.168.12.3 or example.com) or over HTTP. Set the environment variables KHOJ_DOMAIN=your-external-ip-or-domain and KHOJ_NO_HTTPS=True if required to avoid this error.
Using Safari on Mac? You might not be able to login to the admin panel. Try using Chrome or Firefox instead.
Configure Chat Model
Setup which chat model you'd want to use. Khoj supports local and online chat models.- OpenAI
- Anthropic
- Gemini
- Offline
Using Ollama? See the Ollama Integration section for more custom setup instructions.
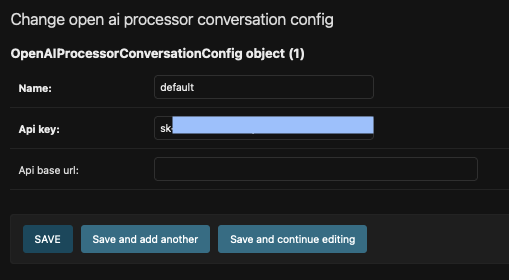
- Create a new AI Model Api in the server admin settings.
- Add your OpenAI API key
- Give the configuration a friendly name like
OpenAI - (Optional) Set the API base URL. It is only relevant if you're using another OpenAI-compatible proxy server like Ollama or LMStudio.
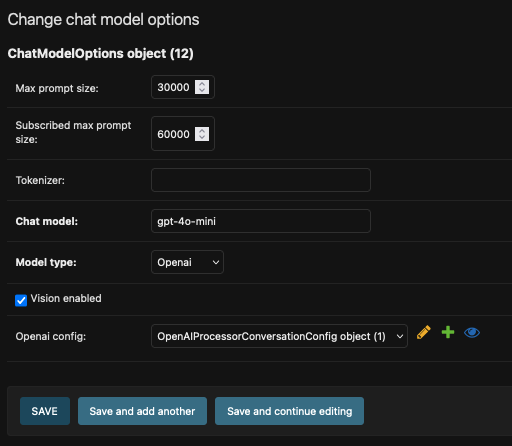
- Create a new chat model
- Set the
chat-modelfield to an OpenAI chat model. Example:gpt-4o. - Make sure to set the
model-typefield toOpenAI. - If your model supports vision, set the
vision enabledfield totrue. This is currently only supported for OpenAI models with vision capabilities. - The
tokenizerandmax-prompt-sizefields are optional. Set them only if you're sure of the tokenizer or token limit for the model you're using. Contact us if you're unsure what to do here.
- Set the
- Create a new AI Model API in the server admin settings.
- Add your Anthropic API key
- Give the configuration a friendly name like
Anthropic. Do not configure the API base url.
- Create a new chat model
- Set the
chat-modelfield to an Anthropic chat model. Example:claude-3-5-sonnet-20240620. - Set the
model-typefield toAnthropic. - Set the
ai model apifield to the Anthropic AI Model API you created in step 1.
- Set the
- Create a new AI Model API in the server admin settings.
- Add your Gemini API key
- Give the configuration a friendly name like
Gemini. Do not configure the API base url.
- Create a new chat model
- Set the
chat-modelfield to a Google Gemini chat model. Example:gemini-2.5-flash. - Set the
model-typefield toGoogle. - Set the
ai model apifield to the Gemini AI Model API you created in step 1.
- Set the
Offline chat stays completely private and can work without internet using any open-weights model.
- Minimum 8 GB RAM. Recommend 16Gb VRAM
- Minimum 5 GB of Disk available
- A Nvidia, AMD GPU or a Mac M1+ machine would significantly speed up chat responses
- Install any Openai API compatible local ai model server like llama-cpp-server, Ollama, vLLM etc.
- Add an ai model api on the admin panel
- Set the
api urlfield to the url of your local ai model provider likehttp://localhost:11434/v1/for Ollama
- Set the
- Restart the Khoj server to load models available on your local ai model provider
- If that doesn't work, you'll need to manually add available chat model in the admin panel.
- Set the newly added chat model as your preferred model in your User chat settings
- Start chatting with your local AI!
Set your preferred default chat model in the Default, Advanced fields of your ServerChatSettings.
Khoj uses these chat model for all intermediate steps like intent detection, web search etc.
- The
tokenizerandmax-prompt-sizefields are optional. Set them only if you're sure of the tokenizer or token limit for the model you're using. This improves context stuffing. Contact us if you're unsure what to do here. - Only tick the
vision enabledfield for OpenAI models with vision capabilities like gpt-4o. Vision capabilities in other chat models is not currently utilized.
Sync your Knowledge
- You can chat with your notes and documents using Khoj.
- Khoj can keep your files and folders synced using the Khoj Desktop, Obsidian or Emacs clients.
- Your Notion workspace can be directly synced from the web app.
- You can also just drag and drop specific files you want to chat with on the Web app.
Setup Khoj Clients
The Khoj web app is available by default to chat, search and configure Khoj.
You can also install a Khoj client to easily access it from Obsidian, Emacs, Whatsapp or your OS and keep your documents synced with Khoj.
Set the host URL on your clients settings page to your Khoj server URL. By default, use http://127.0.0.1:42110 or http://localhost:42110. Note that localhost may not work in all cases.
- Desktop
- Emacs
- Obsidian
- Read the Khoj Desktop app setup docs.
- Read the Khoj Emacs package setup docs.
- Read the Khoj Obsidian plugin setup docs.
- Read the Khoj Whatsapp app setup docs.
Upgrade
Upgrade Server
- Pip
- Docker
pip install --upgrade khoj
Note: To upgrade to the latest pre-release version of the khoj server run below command
Run the commands below from the same directory where you have your docker-compose.yml file.
This will fetch the latest build and upgrade your server.
# Windows users should use their WSL2 terminal to run these commands
cd ~/.khoj  # assuming your khoj docker-compose.yml file is here
docker-compose up --build
Upgrade Clients
- Desktop
- Emacs
- Obsidian
- The Desktop app automatically updates to the latest released version on restart.
- You can manually download the latest version from the Khoj Website.
- Use your Emacs Package Manager to Upgrade
- See khoj.el package setup for details
- Upgrade via the Community plugins tab on the settings pane in the Obsidian app
- See the khoj plugin setup for details
Uninstall
Uninstall Server
- Pip
- Docker
# uninstall khoj server
pip uninstall khoj

# delete khoj postgres db
dropdb khoj -U postgres
Run the command below from the same directory where you have your docker-compose file.
This will remove the server containers, networks, images and volumes.
docker-compose down --volumes
Uninstall Clients
- Desktop
- Emacs
- Obsidian
Uninstall the Khoj Desktop client in the standard way from your OS.
Uninstall the Khoj Emacs package in the standard way from Emacs.
Uninstall via the Community plugins tab on the settings pane in the Obsidian app
Troubleshoot
Dependency conflict when trying to install Khoj python package with pip
- Reason: When conflicting dependency versions are required by Khoj vs other python packages installed on your system
- Fix: Install Khoj in a python virtual environment using venv or pipx to avoid this dependency conflicts
- Process:
- Install pipx
- Use
pipxto install Khoj to avoid dependency conflicts with other python packages.pipx install khoj - Now start
khojusing the standard steps described earlier
Install fails while building Tokenizer dependency
- Details:
pip install khojfails while building thetokenizersdependency. Complains about Rust. - Fix: Install Rust to build the tokenizers package. For example on Mac run:
brew install rustup
rustup-init
source ~/.cargo/env - Refer: Issue with Fix for more details
Khoj in Docker errors out with "Killed" in error message
- Fix: Increase RAM available to Docker Containers in Docker Settings
- Refer: StackOverflow Solution, Configure Resources on Docker for Mac